Tools Needed:
-Electric drill
1/4' drill bit
-Masking tape
-Phillips-head
screwdriver
-7/16 wrench
-101, 4200, 5200
marine sealant Must be rated for underwater use. Silicone is not -recommended.
-Tools to remove
your propeller
-Small rags for
cleanup and to cover prop hub
-Sealant Cleaner/Remover
safe for painted surfaces (If needed)
The
following pictures show a 001 Permatrim being installed on a 2004 F75 Yamaha
outboard. All top-mounted AV plate
Permatrims are mounted in this fashion.
All Permatrims are motor/model specific.
You will not need to alter the Permatrim to make it fit. If fitting does not seem correct please call.
Smaller outboards
use 4 bolts per side.
Engines over
115hp use 5 bolts per side.
|
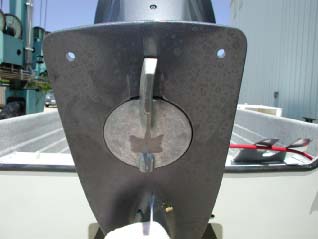
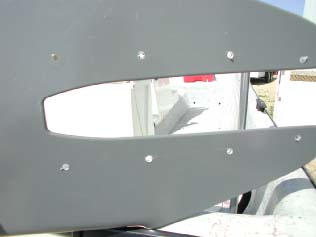
STEP
1:
Remove propeller and cover prop hub
area on gear case with a rag to protect from shavings entering this area. Removing the propeller gives you more room
to drill.
|
|
|
STEP
2:
Drill the first two holes, one
each on either side, aft of the sacrificial anode. A definite measurement on the gear case may
be difficult so you will need to eye it up and use your judgment. Make sure all drilled holes are well in
from the edge of the ventilation plate.
Generally this will be about .
|
|
|
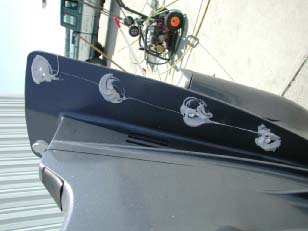
STEP
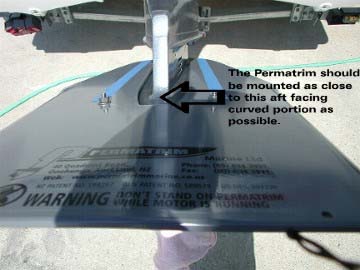
3:
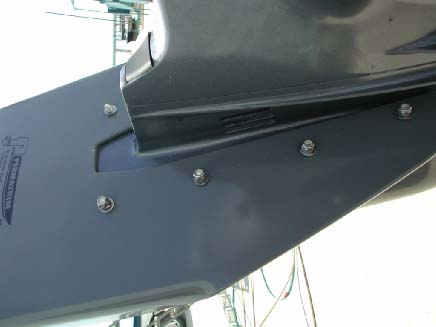
Place the Permatrim over the top of
the AV plate. Make sure the Permatrim
is straight. The Permatrim should be
mounted as close to the raised section as possible without lifting the
Permatrim off of the AV plate. (The
Permatrim in the picture is being installed on a single engine catamaran
style boat and needed to be mounted further aft. This is not the norm. The Permatrim should be against the raised
section.)
Once the Permatrim is in place use a
clamp, or a extra hand, to keep the Permatrim in place while you drill
through the two holes you just made in the AV plate to mark the Permatrim
with the drill bit. Do not attempt to
drill completely through. Remove the Permatrim and drill 1.4 holes through
where you marked. Temporarily mount
the Permatrim using two bolts, but tighten the bolts only enough so that they
keep the Permatrim in place for drilling the remaining holes.
|
|
|
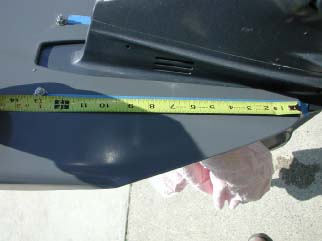
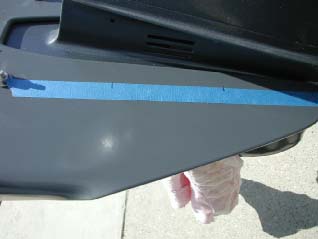
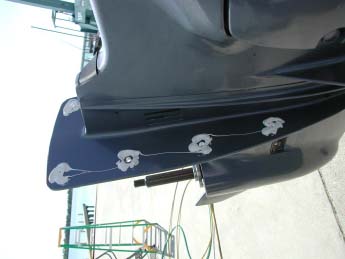
STEP
4:
Starting from the center of your
first bolt hole (the temporary bolts), place a piece of masking tape from the
center of the bolt towards the front end of the Permatrim. Check the underside of the Permatrim to
make sure that the tape line is at least inboard from the edge of the AV
plate. On most outboards the tape
lines will not be parallel and will angle slightly away from each other
following the shape of the AV plate. Using
a tape measure mark the remaining bolt holes.
Remember, 5 bolts for motors 115hp and above, and 4 bolts on all
others.
The very most forward bolt hole
should be 1 to 1-1/2 from the most forward part of the Permatrim to make
sure you will be catching enough of the AV plate. AV plates come in various shapes so you
will need to use your judgment.
You may place the tape on the
underside of the AV plate and drill from the bottom if it is easier.
|
 |
|
STEP
5:
One your bolt holes are marked you
may drill the Permatrim and the AV plate together. As you go forward, the clearance from drill
to the side of the engine will become close.
Beware of the drill chuck spinning in to the side of the engine. On some engines this may be too close and
it may be best to use the next size drill bit and drill the forward holds in
a slight angle. The slightly bigger
holes will allow the bolts to sit flat even though they are at an angle.
Once drilling is complete remove the
two temporary bolts and remove the Permatrim.
Clean the metal shavings between the Permatrim and the AV plate. Dab a bit of the marine sealant around each
bolt hole on top of the AV plate.
|
|
|
STEP
6:
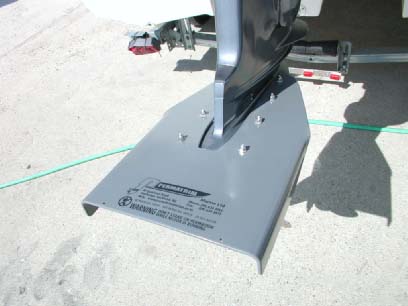
Place the Permatrim on top of the AV
plate. Install all bolts from the
bottom up through the AV plate. Place
a flat washer on top of the Permatrim over the bolt followed by the nylock
nuts. Slightly tighten all bolts until
all bolts are installed. Once all
bolts are installed, start tightening the middle bolts and work aft. Then tighten the most forward bolts
last. Make sure the Permatrim is
laying flat on the AV plate before completely tightening.
The torque spec is approximately 10ft
lbs. Be sure not to tighten too much
as they can snap.
|
|
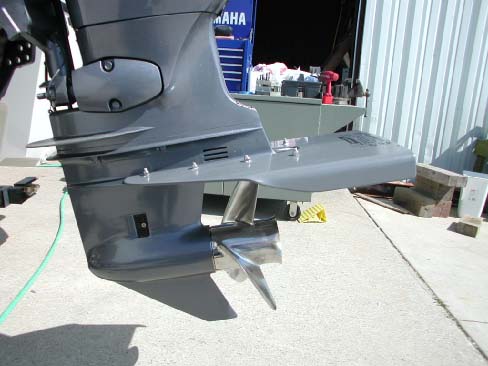
The Finished Product:
Please
feel free to contact us with any installation or use questions you may
have. With properinstallation and care
the Permatrim will last the life of your outboard.
Permatrim Hydro-Foils USA
Andrew J. Munao, Jr.
Toll Free: 888-231-2374
[email protected]